Tuesday 13 May 2008

A forgotten Sertorian Legionary update

This is actually an update from a few weeks ago. I posted it on HF but somehow forgot to post it here.

  • Face has now been finished off. Not 100% happy with it personally, but the missus likes it so I guess it'll do.

  • Scarf has been finished off with a wash followed by a series of highlights followed by a glaze.

  • Helmet's done.. don't ask me how, quite honestly I can't remember... I sort of followed Daniello's method substituting a few items for others I had...

  • Plume... Hmm, worked on this today. Started off with a BC of VC822 plus a dash of black, followed with a heavy wash of Citadel Black Ink. Then DB'ed the BC, followed by a couple more lighter coats. Finished off with another wash of Black Ink. Suspect the ink has toned the highlights down too much though... might have another pass with the highlight...

  • Mail has been treated with a wash of Lamp Black and Burnt Umber oils.


And yes, that really is clingwrap ("seran wrap"?) around the figure. Picked up the tip from Mike Butler over at Medrom. Prevents finger oils from contacting the figure and rubbing off the paint.

The mail was allowed to dry overnight, and was then treated to a Tamiya Smoke wash. I'm don't work with Tamiya acrylics too often, so I thought I'd better give a chance to dry properly overnight - probably overkill...

The groundwork as also been treated to a series of dry-brushings. To be honest I can't remember the colours, so it's probably not a good idea to ask me...

Monday 12 May 2008

Platoon's 12SS HJ Normandy ala Tan: Part 2

Preparation: Information Gathering


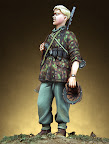
The first thing I do when starting any figure is to look for reviews of the topic. Now unfortunately it appears the only review of this figure is mine. In a way that's a pity, as I would have liked to have seen if the experiences of others were the same as mine. On the other hand, it's quite flattering.

Next I'll look for painted versions and interpretations of the figure. Again a search, albeit a quick one, yields nil. It's always nice to see how someone else interpreted the figure, although it's important not to merely clone their figure.

That was the "informal" and easy part of the information gathering. The next phase can become time consuming but it's an important stage as it will not only help you ascertain the accuracy of the figure (if that is important to you), but it will help you place the figure in terms of groundwork as well as defining your colour palette.

These are the references I used when reviewing the figure:


  • “Waffen-SS Soldier 1940-45”. Warrior 2. Bruce Quarrie. Illustrated by Jeffrey Burn. Osprey Publishing. 1993.
  • “Waffen-SS in Combat”. Robert Michulec. Colour Plates by Ronald Volstad. Concord Publishing.
  • “Waffen-SS (2) From Glory to Defeat 1943 – 1945”. Robert Michulec. Colour Plates by Ronald Volstad. Concord Publishing. 2000.
  • “German Combat Equipments 1939-45”. Men-at-Arms 234. Gordon Rottman. Illustrated by Ron Volstad. Osprey Publishing. 1991.

However as I now need to actually paint and place the figure, not only will I recheck these references, but I browse through more sources including Wehrmacht references.

Something else I tend to do before undertaking a figure is to browse through my figure modelling books. For this figure the two books in particular that I referenced are:

  • "Modelling Waffen-SS Figures". Osprey Modelling 23. Calvin Tan. Osprey Publishing. 2005.
  • "Modelling Fallschirmjager Figures". Osprey Modelling 31. Jaume Ortiz Forns & Daniel Alfonsea Romero. Osprey Publishing. 2006.

I also reread though an excellent camouflage article on HF to help motivate me: Painting 3 Types of German WWII Camouflage by Pete Becerra Jr.

As I mentioned though, during this build I will be applying Calvin's technique, so his book will become my primary reference.


Preparation: Supplies


Having gathered enough information (is there such a thing as enough information?) I put together a preliminary list of colours I will be using on my palette. In recent times I've gradually been moving away from enamels and oils to acrylics. Unfortunately my wife appears to have some sort of allergic or chemical reaction to oil based paints and solvents so I need to minimise their use when she's around. And so, I've gradually been replacing my trusty old Humbrols with Vallejo's Model Colour range, as well as acrylics by Citadel and Tamiya where the Vallejo's are unavailable. Unfortunately Vallejo is not too popular in South Africa, and only one LHS in Cape Town stocks them. Colours like Sunny Skintone seem to always be out of stock, and you're not always guaranteed to find everything you're looking for, and so you are forced to substitute where you can.

But back to the list of colours, as I said, this is a preliminary list of colours I'll be requiring:

VC# Chart Pos Name Comment
837 7 Sand light  
915 14 Deep yellow  
845 20 Sunny skintone Out of stock. Sub w/ 815 Flesh Tone
909 28 Vermillion  
835 37 Salmon rose  
899 50 Dark Prussian  
833 80 Germ.cam.  
975 89 Military green ja  
890 90 Reflective green  
889 91 Us olive drab  
924 94 Russian uniform WWII  
896 99 Cam.extra dark green  
830 102 German fieldgrey WWII Out of stock. Sub w/Tam XF-22
821 103 Ger. cam. beige WWII  
986 110 Deck tan  
988 115 Khaki  
847 123 Dark sand  
824 128 Germ. cam. orange ochre  
981 131 Orange brown  
875 135 Beige brown  
984 140 Flat brown  
921 141 English uniform  
873 142 Us field drab Out of stock. Sub w/?? Maybe English Uniform or Burnt Umber?
825 144 Germ.cam.  
985 146 Hull red  
871 147 Leather brown  
822 150 Germ. cam. black brown  
950 169 Black  

I'll also be using Humbrol Silver 11 and Tamiya X-21 Flat Base.

Tip: Prior to going to the LHS I always make a complete but preliminary list of all the materials I'll be needing for the project. I then cross off all the supplies I already have. You will note I sort the AV colours by chart position so as to make finding them in the LHS's paint rack a bit easier.

Paint however is not all we need to finish a model, is it? I'll also be using Tamiya filler putty, CA glue, epoxy glue, paper clips for pinning parts, paper or plasticard for straps, brass or fuse wire for buckles, and maybe the other odd bit or bob.

How about the base and groundwork? I have a general idea in mind of what I want to do. Something rather simple in fact, the figure's going to be complicated enough as it is, no need to recede my hairline further by complicating the groundwork. The groundwork will probably consist of epoxy putty, fine gravel, static grass and the odd root or twig. Later I'll add some WS Flock and grass.

Now that I have gathered the supplies, it's time to start cleaning up the figure and preparing the groundwork.

Platoon's 12SS HJ Normandy ala Tan: Part 1

Against my better judgement but doing it for the sake of my HF peeps I have decided to participate in Historicus Forma's latest contest: The Pegaso Painting Contest 2008 (PPC2008). For more info, check out Historicus Forma - see the link in my sidebar.

The figure I've selected is one I reviewed a few months back, Panzergrenadier ‘Hitlerjugend’ 1944 from the Platoon range of figures. Here's the review: In-box review

These first pics are those of the box art and not my work:

These are the parts in the box, and as I have yet to start still in this state:

I am an absolute glutton for punishment. Not only do I hope to finish the figure on time, but the plan is to paint the figure using techniques described by Calvin Tan in his "Modelling Waffen-SS Figures" book which was published by Osprey a few years ago. These are techniques I've never tried before.

To compound the situation further, the plan at the moment is to attempt to paint 3 different SS camouflage patterns on this figure. I'll not say which schemes or which parts yet, but know this: this is the most "technical" figure I've yet to undertake as this will be my first real attempt at camo (previous attempts being bad attempts a BDU and choc chip many, many years ago).

Sunday 11 May 2008

Elizabeth I (1533 - 1603)

Manufacturer: Ademola 22
Item Code: 200 0019
Scale: 200mm
Material: Metal
Sculptor: Roman Rux
Review Publication Date: May 11th 2008

Elizabeth I (7 September 1533 – 24 March 1603) reigned as Queen of England and Queen of Ireland from 17 November 1558 until her death. Often referred to as The Virgin Queen, Elizabeth was the sixth and final monarch of the Tudor period. While certainly not without her own problems and controversies, subsequent to the short reigns of Elizabeth's brother and sister, her forty-five years on the throne provided precious stability for the realm and assisted in fashioning a sense of national identity.

Ademola 22’s 200 019 Elizabeth I (1533 – 1603) is a 200mm scale resin bust sculpted by Roman Rux with him also having done the box-art. The figure represents Queen Elizabeth I of England during the latter stages of her life. The sculptor does not appear to have based the sculpt on anyone single artwork, but appears to have used various artworks of the regent as a source.

Thursday 8 May 2008

Great haul, and yet...

Time for what seems to be a monthly post. Apologies, things have really just been a bit crazy with trying to get things sorted for "The Thing". I'm not quite ready to discuss "The Thing", but I promise I will be spilling the beans soon. Probably towards the end of the month, but inevitably everyone will know soon anyways.
Anyways, as the title says, "Great haul, and yet...".
About 2 days ago I received a phone call from a good friend of mine, Roland, who happens to run a hobby shop. "Rudi, my old chum, my old mate, oh great guru of model related items" he says (okay... he didn't say "old chum"), "I've just received a call from a fella whom is selling an Aztek airbrush, in wooden box with 3 nozzles and a hobby compressor for R500." Now I won't get into the exchange rate discussion or even the math, but know that R1 (ZAR = South African Rand) equal about US$7-8. This is one good deal!
"What's wrong with it?" I says, being all too sceptical of this all too good sounding deal. "Well I haven't actually seen it," my chum says, "but apparently nothing. This dude needs cash urgently, today even, and is desperate to sell. I don't know too much more, but he bought it from Brian (the owner of another LHS) a few years back." Now, knowing what Brian sells, I probably have quite a good idea of the value of the item.
"Hmmm," I thinks doing the sums in me noggin (not only did I pass Matric with an A in mathematics and do 'varsity maths, but I can multitask!), "this all is worth over R2000 at least. The compressors sell for at least R1000-1500." Roland gives me his number and I prepare myself to tackle the next huge hurdle: clearing this transaction with the missus!
I'll spare you the embarrassment of me discussing (i.e. asking permission) this with the lil' lady, which I think must have brought a big smile to the faces of my colleagues, so we'll leave it at she said yes.
So, now having permission, I ring the seller up - no answer. A bit later, I ring him again - he answers. Turns put he's actually visiting Brian's store, which is not 5 minutes from where I'm working. Since it was near quitting time, I asked him to wait there for me.
With ants in my pants I eagerly watched the clock drag it's lazy arms for those 15 minutes before rushing out, telling the security guards to sod their Apartheid style car search.
Their waiting in Brian's store was a rather rough looking middle-aged gent. Unshaven and looking the worse for wear he'd definitely seen better days. We took a stroll out to his little hatchback sedan. I noted the Zimbabwe plates.
As we chatted, he revealed he had been working for a gent up in Zim, keeping the farmer's equipment running for many years. The gent had recently passed on through a series of unfortunate events: partially due to the state of that nation, partially due to illness, partially due to money hungry family members. The mechanic had been promised something for his years' service, but this had not materialised due to the meddling of aforementioned family. Now, he had moved down to SA in the hope of making a new life. Hard up for cash he was now selling off his modelling gear.
I checked the brush and compressor, I paid him and we parted ways.
But why the title "Great haul, and yet..."? Well simply because when I got home I gave the gear a really good looking over, and it's in great condition for stuff about 6-7 years old. Without a doubt, I've scored big time here. Seriously a great bargain! Great haul!
And yet... I feel guilty. I know the guy is hard up for cash. I know this stuff is worth more. I know if he had gone to a pawn shop or waited a few days more he could have got double, if not triple, the amount I payed him for it.
Should I feel guilty? I paid him exactly what he wanted...

Thursday 1 May 2008

Lord of War 3

Manufacturer: DraconiaItem Code: FAN-03Scale: 54mmMaterial: MetalSculptor: Phillip DamontReview Publication Date: April 30th, 2008

Draconia is a relatively new figure company brought to us by Jose Jarque, who also brought us Ares Mythologic. The range of figures currently comprises of 30mm and 54mm fantasy figures. The subject of this review is the third of the four Lords of War: the 54mm “Lord of War 3”, or “Lord of the West, Brother of the South, North and East, Maestro of the Steel”.

FAN-03 “Lord of War 3” is a 54mm white metal figure sculpted by Phillip Damont with box-art by José M. Palomares. The warrior is portrayed wearing garb with a mixture of Asian influences advancing holding two large and dangerous looking swords.

http://www.hfmodeling.com/modules.php?op=modload&name=Reviews&file=index&req=showcontent&id=3179

http://gallery.kitmaker.net/data/21698/thumbs/LordofWar_3.jpg